Tuesday, October 21, 2008

Leaves are falling and so is the temp

Well the trees are in full color and it is the best year for foliage. I have been working on fitting up the boat for next year. I pretty much have finished all painting, just a few odd pieces that I will do in the spring. I have been trying ot mount my bilge pump and tried a failed idea. I want to be able to switch out a pump easy. My hull is the design that makes mounting my Lovlett pump difficult. Since the skiff is a lapstrake I have oak ribs pretty close to gether which makes mounting the pump on the keel impossible. So I thought I could use a Battery strap to hold the pump in place, see pics.


The problem I found is that when I strapped in the pump I still had movement, not much but I still had some. The reason I want an easy method to swap out a pump is that my backup pump is a Ruleamatic. I have removed this set up epoxied the holes and have come up with a different plan tha tI think will be better. I have Aluminum angle metal that I will cut 2, 1 1/4" pieces. There will be a single screw hole and a slot. For the slot I will take a large hose clamp and cut it in half. On ht ecut end I will make a curl for the slot on the aluminum bracket, like on our Autolite Distributors. I can screww the bracket to the keel then use the hose clamps as the binder. Sounds good, but I will use a piece of scrap wood to see how this will play out before I try an install on the boat.

The next thing I have been working on is the cooper exhaust. Mine was cut to make a v-8 fit where a 6 cyl use to be. I have found a 6 to put back in and cannot afford a new pipe. I recently won a section of exhasut on ebay that I believe will let me piece together the exhaust. It wont be perfect but is will be functional! It came with a slip fit iron coupler that I had to remove. Some PB Blaster and alot of heat it came right off. I kinda laid the sections together to see how it might look afer fitting.


So after all this work I was in the Basin Harbor Red Mill for last night drinking a beer when I run into the Paul brothers and in talking with one of they he said to his Brother I have one of those and you can have it.......Now I just need to see if he remembers, it was a good night had by all!

Friday, September 19, 2008

What happened to the summer!

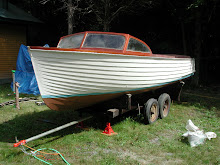
Wow did time fly by and I am still not done. I was trying to get the boat done for the LCACBS Boat show in August and just ran out of time. Button Bay looks great trees are just starting to change and the water is starting to change its color. I have been working on Honey-Do's and continuing to knock things out on the boat. At this point I am 1 coat away form finishing painting th ehull as you see by the photoes. On the bilge I used Interlux Bilgecoat and for the trim I used Rustoleum Almond because I liked the off white. I figured I would see how this holds up and if it does not I can use th einterlux Hateras White. It was interesting in that the bilge had alot of pld dusty oily crud and it took some work with a degreaser to get most of it off. I think adheasion is good but will not know for sure until I put the boat to use. I do need to do touch up on the outside because I got sloppy with some stain. Things are settling in for Fall's arrival on Monday and I beieve I will have all the painting done this weekend, which means I will start to do the fit up and have it ready fo ra Spring launch, or early summer depending the amount of debrie in the water. Well that is it for now I will be posting more regular now that things will settle into more inside activities.


Tuesday, July 22, 2008

More Varnishing and Staining

I have moved onto the stained sections of the boat and have made pretty good progress. Getting the stain even was hard and it did not come out perfect, but I think looks good. I found in applying my varnish I ad these dishes, not fish eyes and finally figured it out, it was moisture drops form my respirator. I sanded down the affected areas and applied my third coat of varnish last night. I still have some sages and am resigned to that fact. I just do not have enough light to catch all the angles.


I am hoping to put the fourth coat on tonight and take a break. It does not look like I will have the boat ready for this summer, but next year it should be in the water.

Also I had a birthday recently and my entire family pitched in to buy me a new aluminum trailer, great huh. I am expecting it this week if everything works out. More to come.

Monday, July 14, 2008

Getting closer!

There has been alot of work this month on Frolic. I am ready to Stain the boat. I have finished the varnish work on the interior that had no stain on it, the rib detail and interior lapstrake. I had sanded and tacked everything then taped in my previous post. I then sealed the area with CPES then 4 coats of Epifanes. Here are some pictures of the result. I believe it came out well. One surprise was when I applied the CPES to the wood, dark areas appeared. I can only think it is areas that had moisture get into the wood. When the inside was sanded you really did not notice it, but now as you can see there are dark areas. I guess I should have bleached the wood, maybe next time!


My goal is to Stain tonight then tomorrow, followed by 2 days of sealing. More to come.

Thursday, June 12, 2008

Summer is almost here!

This spring has been a different one in that it has been cooler than others, which has prevented me from varnishing the boat. My shop not being heated makes me a prisoner to the weather. Things are starting to change though and I believe I can start varnishing the inside of the hull next week.

I have been working on other projects like my keel son repair. My starboard keel son had some soft spots where some screws went for the engine, the V-8. The plan is to route off the top 1 inch glue and screw a new cap in place. I lucked out on the Douglas Fir I am using in that I traded a converted hay wagon to a contractor who happened to have some quarter sawn boards.

Here is what I started with

I started routing off the starboard
Then I cleaned everything up doweled the holes form the screws with Mahogany dowel stock, fixed a slight crack and got it ready for capping.

I laminated in the side pieces everything was clamped and screwed with silicone bronze. At the end I put 2 coats of CPES to protect the repair since I have to clean the bilge before painting.


After the Keel son work I cleaned up the inside of the hull above the bilge and put 2 coats of CPES getting ready to varnish. This went well but some dark areas showed after treatment that were not as visible before treatment.


I also performed a repair of my starboard deck. At some point somebody must have installed a radio antenna that caused the veneer to lift. There was a repair to the whole but the bond between straights separated. Here I had to drill 3/4" holes in the deck to get bar clamps installed. I then through a series of pilot holes injected west systems into the void. I then made a press out of plywood and then attached a very heavy piece of plastic film as my release agent. I clamped everything down hard and let it sit. I removed the board without issue and sanded the area. The bonding was successful and I plugged the holes with Mahogany dowel and sanded fair.


Well that is the major stuff for now.

Monday, April 21, 2008

Warm Weather on Button Bay and the snow is almost gone!

This past week has been un-seasonally warm and I have been working on finishing my varnish work on the pieces I removed from the skiff. Things have been going well and my brightwork has been inproving, But still have stuff in my work, oh well. I am finishing one of the biggest pieces, the front bench seat back. THis one is challenging because of its size. I tried the roll and tipe method that many use. THis method is definatly faster but I still find I get better results with just the brush. I have not learned the best method to load a foam roller. Her e is some pic's I took after the last coat of varnish was applied.


On another front since the weather is getting better is working on my engine stringers. My boat originally came with a 6 cyl but the original owner changed the power plant to a v-8 to get the skiff to go faster. He said it did not improve anything. I have located the correct Chris Craft motor and will go back to the 6 cyl. Since the v-8 mounted differently I have been removing threaded rod and rotted dowel rods to get thes tringer ready for new dowel rods and on the startbard stringer I need to take 1 inch off the top to deal with some surface rot. AS you see below I have drilled out the sections and now have CPES in the holes trying to stabilize the stringers before they are doweled. Once the CPES drys up I will route off the top of the starboard stringer then dowel that piece before I lay in its new top. It will be glued and screwed. A side note on material cost is that they have sky rocked and I believe it will get worse. What scares me other than the economy hitting hard times is the challenge of finishing this skiff before I cant affoard ot work on it anymore.


The next thing to tackle is making an engine box. I bought the African Mahogany Lumber All I need left is the Mahogany plywood for the sides. I am going to get new Marine Fir plywood for the floors. The original flooring has been cut for the v-8. Well more to come tomorrow or when ever.

Tuesday, April 15, 2008

Spring is coming SLOWLY

Well here it is mid April and we had snow showers over the weekend. The ice is off button bay and Trout season has started. I have been working on varnishing more pieces and had to strip some pieces I thought I finished but some how the stain did not match as well. The initial pieces I did where a little yellow compared to my recent stain work which is more red'ish. Some of the pieces I am reworking are more lighter color from sun exposure so I need two applications of stain to somewhat even things out.


Here you have the front bench in sections and it has an orange tinge which highlights the lighter sections so I put on a second coat of stain to darken it a bit more.

Here is a shot after sanding the third coat, as you can see it is darker. I think it blends a little better with the differing wood color.


I had a dickens of a time getting the front bench seat uprights done in that I constantly was getting sags. It was to the point of sanding down to the satin and starting over. I did get them presentable. I have 5 good coats on these pieces and am in the process of varnishing the seat back for the front.

Thursday, March 20, 2008

Man when is the cold gonna go away!

Well here on Button Bay the ice is still around and the weather is all over the place with temps below 20 one day and 40's the next. We have been getting a mix bag of Snow, Ice, and Rain. I have been busy down in the basement working on various projects this week.

I finished my small pieces and they came out pretty good but still have stuff in the finish, rrrr! Here is one of the side box steps


The rest of the items came out well and the one step I repaired looks pretty good.


After I finished the varnish work I switched gears to repair my front bench seat. It had a crack in it an various screw holes to dowel. What I plan on doing is epoxying the crack then glue and screwing a piece of White Oak underneath to strengthen the area. In the picture I have injected the epoxy into the crack with West System syringes. I used tape on the back side to hold the epoxy in the crack. I then use the seat brace pieces on the underside of the seat to apply preassure to close the crack. I then used claps across the crack to draw it tighter. I am letting it set up before attaching the oak plank. I will bevel the plank like the seat to give another row of material to screw the back to the seat.


I am doweling the screw holes because most were really reamed out. I did track down some mahogany dowel rod and am epoxying it in place. I have some high spots I will need to sand down for a tight fit. After I get these cleaned up I will stain and varnish.


While this setting up I began to stain my rear bench seat. I am getting use to the stain but do not paint it on as they say on the label, then wipe off. I use the same staining method I learned from my father in that I use cheese cloth, an old dark glass wine bottle and work the stain across the grain then rub again with the grain. I like the out come and do not waste as much paste. The down side is it is not as fast as the paint method. I like how it works.


I also tinkered with painting the steering wheel. I used rustoleum almond and it is really close to the original and pretty inexpensive. One thing I did not see when sanding the wheel was hairline cracks that when I painted stuck out like a sore thumb. I am hoping additional coats will color these areas.


Well thats about it for now, more to come when I finish varnishing the rear bench seat.

Tuesday, March 11, 2008

Varnish, varnish and more varnish

With the ice storm hitting Vermont I started in the basement varnishing a few small pieces like my step box tops and the trim ring for the steering shaft. I have pre-pictures below. One of the steps was cracked right in half, but I liked the look of the grain so I repaired them by epoxy and a piece of wood to strengthen the damage area.

I have been trying out the Epifanes Wood Gloss Varnish which does not require sanding between coats if done within 72 hours. I figured with all the rib detail on the inside of the hull this would be a good choice. I am not the best a bright work and can never get a perfect finish. I always have something in my finish, dust, hair, whatever. I find this product is a little harder to work with than traditional varnish. It seams to attract more contaminants, I am not kidding, and I find more dust in my work. I am applying 4, maybe 5 coats then re-coat next year. I cannot get the mentality of 12 coats before it hits the water, but admit it looks nice.

The temperature here on Button Bay is still cold and I cannot do my repairs or varnishing on the hull until spring arrives and 60 degree temps are here again, maybe May. For now after this round of varnishing I need to turn my eye to the benches and repairing screw holes and fixing a crack in the seat of the front bench. I got a piece of White Oak (way over kill, but the price was sooooo cheap I could not resist) and dressed it up with my father-in-laws surface planer. Once I have the varnish out of the way I will work on these pieces and then stain and varnish. I have noticed that the solid mahogany pieces are staining darker than the mahogany plywood pieces.

Well that is where I am for now, more to come.....